Monday, June 30, 2008
Chicken Thanks
This was the card I sent to my scholarship donor this year. It's one based on poultry interest so of course I had to use best of cluck images from the wish rak group on Splitcoast since I don't have the set myself. I used my new mat pack from SU to help align the holes. I didn't do a perfect job of lining it up but it came out alright I think. The background was stamped with the Aida which helps to give it something but it doesn't detract from the image. I just watercolored the image with several of the yellows off of the top of my ink pads. I also used the wonderful ticket corner punch to make areas for the brads. I just like the end look of several layers with the punch.
Friday, June 27, 2008
It must be bunnies
Ok so this may be a strange time to post this but I never got these done in time for Easter I know the shame >.> give me a break I'm a vet student I was studying. But they are done for next year. Gamsol and stumps for coloring prima flowers with brads in the middle and the floral background. All stamps are stamping up. You know the hardest part of coloring for me is making sure to leave some pale areas so there is contrast. I'm working on it I swear.
Monday, June 23, 2008
Stampers Diamonds
When my mom saw these all stacked up out of the package she remarked that they looked like diamonds. I have to say I agree they do look awful pretty. They will probably be covered in ink in no time though.
This is the Martha Stewart one that I didn't attach the handle to because I didn't think it would help all that much it'll be great for large backgrounds now all I have to do is get some Tack n' Peel on it.
One last shot of these beauties from the side. ;) They are the ones you can get at Michael's and I like the fact that they have the waves to make it easier to hold them. They also have a cross cut into them so you can line up your stamp which is nice.
Saturday, June 21, 2008
Magenta Butterfly
Here is a card I'm pretty proud of the color doesn't really show up well but you get the idea. I couldn't resist putting little crystals all over it.
Here is a close up of the butterfly so you can see his magnificence. :P I love butterflies and have just a few.....er well dozen stamps of them. This one is a Magenta stamp I really like just about all of their lines.
Friday, June 20, 2008
Torch Tools and Glass Bead Information
I had someone ask about making glass beads today and I just thought I'd share a couple of photos of the torches that Derek and I used for class and some resources I've found to be helpful. My father has an oxygen propane tank torch at home that I've been using but I found this set up to work quite well and it would be more affordable to start out with. When the gas can runs out it has to be replaced but I think it lasted at least 6 hours for the class. It is kind of funny when you are using these because the gas can gets so cold. Which felt quite good when I picked up a piece of murrini cane that I had just barely touched to a bead I thought it wouldn't be hot from that one second of contact. Doh.
So for a starting book I would recommend Kimberley Adams The Complete Book of Glass Beadmaking it has lots of good information about starting up and such. Since working with glass can be harmful if not done with safety gear it goes over some of this as well. A great web forum for glass beadmaking and several other forms of jewelry I would recommend Lampwork Etc it's a really friendly group and they have answered my newbie questions very readily. The last resource recommendation I have is by Corina Tettinger and it's called Passing the Flame it is a bit spendy but the color pictures are well worth it and the information is excellent she explains lots of little things that totally make sense but I would not have thought of since I'm so new to the hobby.
Thursday, June 19, 2008
Sutured Thanks
This is a card I made last year for a gal that works with the students for junior surgery and some during the sophomore year as well. She has gone back to Alaska now which is too bad because she was super nice and was really efficient. The strangeness you see on the T is sutured I thought it was appropriate given whom it was for.
Sunday, June 15, 2008
Ok here is the end result of those random photos
I'm still not quite getting the photo thing right I'm going to have to read up.
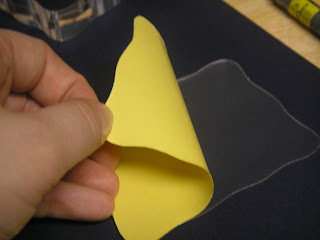
1. Essentially you take the tack n peel and trace your block onto the yellow portion.
2. Then you cut it out with scissors and take off the yellow portion and stick it to the block. Be careful because once it's stuck it's there until you decide to rip it off.
3. You now should make sure to label the clear cover with a sharpie since you don't want to throw this away because you use it to cover the tacky portion when you are not using it. So it doesn't stick to random objects say like your cat. ;)
4. Remove plastic cover place stamp on and ink away.
5. Stamp just like you normally would.
6. Enjoy result of a crisp clear image that you can see where you are placing it instantly.
7. Repeat.
Seriously it's that simple no fussing with glue or cutting out cling adhesive. I found that so far the ink comes off quite easily with normal stamp cleaner or water. Then just place the plastic cover back on and it's all ready to go again. It's a pretty sweet way to use unmounteds. Especially for those of us that are lazy like me. I used to just take hermafix tabs and attach the stamp that way because I was too lazy to use cling mount, halos, or tack it over and over glue.
Subscribe to:
Posts (Atom)