Monday, July 28, 2008

Elegant Wedding Thanks


I made a bunch of these in different color combos for three different weddings. Red, Green, and Blue. The background stamp is SU's French Flair the side swirls are from the SU set Noteworthy. I used the Kandi Kane to apply the jewels it's really easy with those no messing around with glue just touch the tip with the heated tool and it melts the glue and you can apply it quickly.

Friday, July 25, 2008

Native American Button Blanket


This is a piece I made when at Women's Own a retreat on the Hood Canal. It is based off of a Native American design from a book that I traced onto felt and made into what is supposed to be similar to a button blanket.

Monday, July 21, 2008

SAR Dove


I made these the Christmas before last the dove and the heart are from SAR (some assembly required) and are really quite fun to make. The dove is from the mobile kit and the heart is the smallest one from the heart set.


These photos don't really do the actual ornaments justice. They were strung on silver thread and I threaded a single light green swarovski crystal bead on each one as well.

Friday, July 18, 2008

Sympathy


This was a card made for one of the office staff at school when her father passed away. I'm sorry but I don't have the paper on hand right now so I can't say who made it or the stamp either. I thought it turned out fairly well since I was pressed for time to create. I have the hardest time using patterned paper for some reason. I tend to horde it all which is silly since the purpose is to craft with it. Popped out some of the flowers with pop dots and embossed in a golden yellow color to add some dimension and class.

Monday, July 14, 2008

Rumisiel Crafting


Here is one of my adorable squidos working hard at assisting me with my crafting. ;)

Friday, July 11, 2008

Kumihimo


This is a Kumihimo marudai with the tamas (bobbins) all set up. Kumihimo is a Japanese braid-making technique which dates to about 550 C.E. The word when you break it down means coming together of threads. It was used by the Japanese to decorate clothing, hang, banners, and lace samurai armor together. Derek got this particular Marudai for a friend who has a Japanese persona and I was making sure it worked properly. ;)


Here is my first piece of braid I tried I was still learning some of the ins and outs of using the Marudai but I think it came out ok.


This is a simple square 8 thread braid I used embroidery floss to create it.


This is the spiral version of the braid which I think I like better personally. I really want a Marudai of my own now so I can make cords for my glass beads. Hopefully my dad can make me one someday. You can use yarn as well to make interesting textured braids of varying thicknesses.

Monday, July 7, 2008

Christmas Kitties

The photos on these aren't that great but I think you get the general idea. These were made with Rangers memory frames and glass. http://www.rangerink.com/memory.htm When I first saw these I knew I "needed" them to make Christmas ornaments. Granted this is the only one I've produced so far but the rest are there so when the whim strikes they are on the ready. :P


The color was added with alcohol inks I think I could have done better with the colors except for I was under a time crunch. I wanted the ornament to go up on the vet school Christmas tree that is decorated with animal ornaments before Christmas break. Last year I made a dove with a heart with the Some Assembly Required stamps I'll have to take a picture and show how neat those are another time. So long story short I quickly whipped this up with the class appeals stickers that are done with Magenta kitties. I put two of them on there to represent my two furry kids Vashiel and Rumisiel.

Friday, July 4, 2008

Rose Notebook

My mom and I made these last Christams with for a group she belongs to called the roses. The pen is an RSVP one that was opened and the shiny beads that don't have holes were put in. A good source for the beads is www.pennywisearts.com The image was embossed in black and then pained with twinkling H2O's the pretty shine is hard to see in this photo. The matting paper if I remember is Stardust and it also shines in the light. The paper for the book is Hot of the Press and it was ran through a large xyron machine which made it sticky on one side and then placed on a composition notebook.

Monday, June 30, 2008

Chicken Thanks


This was the card I sent to my scholarship donor this year. It's one based on poultry interest so of course I had to use best of cluck images from the wish rak group on Splitcoast since I don't have the set myself. I used my new mat pack from SU to help align the holes. I didn't do a perfect job of lining it up but it came out alright I think. The background was stamped with the Aida which helps to give it something but it doesn't detract from the image. I just watercolored the image with several of the yellows off of the top of my ink pads. I also used the wonderful ticket corner punch to make areas for the brads. I just like the end look of several layers with the punch.

Friday, June 27, 2008

It must be bunnies


Ok so this may be a strange time to post this but I never got these done in time for Easter I know the shame >.> give me a break I'm a vet student I was studying. But they are done for next year. Gamsol and stumps for coloring prima flowers with brads in the middle and the floral background. All stamps are stamping up. You know the hardest part of coloring for me is making sure to leave some pale areas so there is contrast. I'm working on it I swear.

Monday, June 23, 2008

Stampers Diamonds


When my mom saw these all stacked up out of the package she remarked that they looked like diamonds. I have to say I agree they do look awful pretty. They will probably be covered in ink in no time though.


This is the Martha Stewart one that I didn't attach the handle to because I didn't think it would help all that much it'll be great for large backgrounds now all I have to do is get some Tack n' Peel on it.


One last shot of these beauties from the side. ;) They are the ones you can get at Michael's and I like the fact that they have the waves to make it easier to hold them. They also have a cross cut into them so you can line up your stamp which is nice.

Saturday, June 21, 2008

Magenta Butterfly


Here is a card I'm pretty proud of the color doesn't really show up well but you get the idea. I couldn't resist putting little crystals all over it.


Here is a close up of the butterfly so you can see his magnificence. :P I love butterflies and have just a few.....er well dozen stamps of them. This one is a Magenta stamp I really like just about all of their lines.

Friday, June 20, 2008

Torch Tools and Glass Bead Information

I had someone ask about making glass beads today and I just thought I'd share a couple of photos of the torches that Derek and I used for class and some resources I've found to be helpful. My father has an oxygen propane tank torch at home that I've been using but I found this set up to work quite well and it would be more affordable to start out with. When the gas can runs out it has to be replaced but I think it lasted at least 6 hours for the class. It is kind of funny when you are using these because the gas can gets so cold. Which felt quite good when I picked up a piece of murrini cane that I had just barely touched to a bead I thought it wouldn't be hot from that one second of contact. Doh.


So for a starting book I would recommend Kimberley Adams The Complete Book of Glass Beadmaking it has lots of good information about starting up and such. Since working with glass can be harmful if not done with safety gear it goes over some of this as well. A great web forum for glass beadmaking and several other forms of jewelry I would recommend Lampwork Etc it's a really friendly group and they have answered my newbie questions very readily. The last resource recommendation I have is by Corina Tettinger and it's called Passing the Flame it is a bit spendy but the color pictures are well worth it and the information is excellent she explains lots of little things that totally make sense but I would not have thought of since I'm so new to the hobby.

Thursday, June 19, 2008

Sutured Thanks


This is a card I made last year for a gal that works with the students for junior surgery and some during the sophomore year as well. She has gone back to Alaska now which is too bad because she was super nice and was really efficient. The strangeness you see on the T is sutured I thought it was appropriate given whom it was for.

Sunday, June 15, 2008

Ok here is the end result of those random photos


I'm still not quite getting the photo thing right I'm going to have to read up.

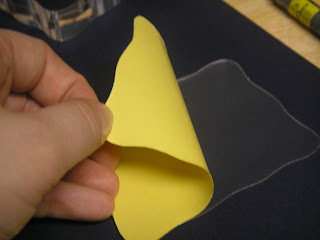
1. Essentially you take the tack n peel and trace your block onto the yellow portion.
2. Then you cut it out with scissors and take off the yellow portion and stick it to the block. Be careful because once it's stuck it's there until you decide to rip it off.
3. You now should make sure to label the clear cover with a sharpie since you don't want to throw this away because you use it to cover the tacky portion when you are not using it. So it doesn't stick to random objects say like your cat. ;)
4. Remove plastic cover place stamp on and ink away.
5. Stamp just like you normally would.
6. Enjoy result of a crisp clear image that you can see where you are placing it instantly.
7. Repeat.

Seriously it's that simple no fussing with glue or cutting out cling adhesive. I found that so far the ink comes off quite easily with normal stamp cleaner or water. Then just place the plastic cover back on and it's all ready to go again. It's a pretty sweet way to use unmounteds. Especially for those of us that are lazy like me. I used to just take hermafix tabs and attach the stamp that way because I was too lazy to use cling mount, halos, or tack it over and over glue.

More photos of tack n peel


First shots of how to use tack n peel


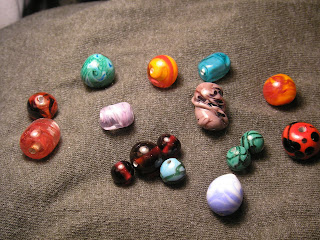
More beads

Here are some more beads. Isn't the turtle one awesome. :)

Monday, January 14, 2008

Beads!


So it's been awhile partially because I wanted to show pictures of beads before moving forward. Studying for finals sucked up all my time and then taking them and leaving was priority. I forgot to grab the beads before I left so here are some of them. The necklace was made on Thanksgiving break and was pretty easy to complete. I'll show some of Derek's beads tomorrow my fave of his is a turtle one that's super neat.